White Balance
It sounds like an advertisement for soap powder but if your whites are not white then all the other colours in your photographs will not be true either.
The tool you use to make sure your whites are really white is called White Balance and one of the first things I do when getting a photo ready for publication is to make adjustments to the White Balance (WB).
What is White Balance?
In very basic terms, the White Balance control is used to make sure that you give your camera the information it needs to reproduce whites as white.
Unless you make suitable adjustments, a photograph taken in natural light outdoors will look very different to a photograph taken indoors under artificial light and a photograph taken using flash will look different to the same photograph taken without flash.
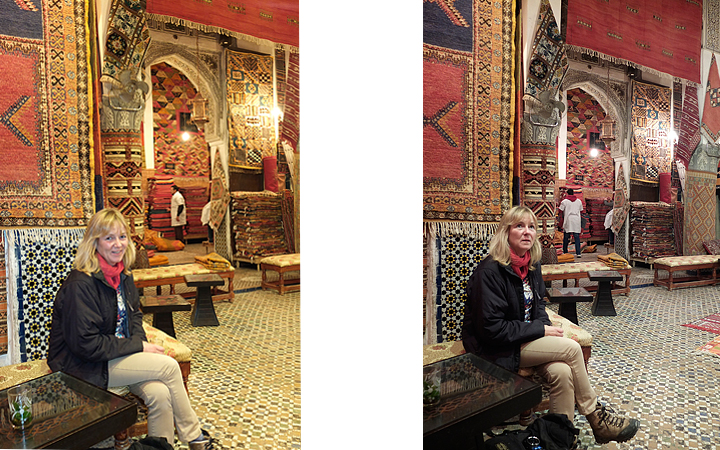
These two photographs were taken within seconds of each other. The left hand shot was taken using the light provided by the lamps inside the shop, the right hand shot was taken using the camera’s flash. You can see that the overall feel of the photographs is very different. The one on the left looks much warmer.
The reason for this, without getting too technical, is that the kind of light, and its temperature, has a dramatic effect on the way your camera handles the data it captures and consequently on the way your photographs look.
The White Balance setting on your camera
Most DSLR cameras have a WB (white balance) setting in the menu or a dedicated button somewhere on the camera body.
This menu option/button allows you to tell your camera what kind of light is prevailing when you take your photos.
Most camera manuals suggest that you set the WB setting to Auto on your camera.
This is fine as a starting point, especially if you are shooting RAW files, because you can always change it in post processing, but it does not mean all your photos will have the correct balance.
But if you are shooting your images as JPEG files, you will get better results if you adjust the WB setting manually according to the prevailing conditions.
Here is a photo taken late on a very overcast day, with the WB setting on Auto. I have made no adjustments to the file, other than to convert the RAW file to a JPEG for publishing.
Right away you can see that the photo has a blue cast and looks very flat. Check out the leopard’s tail where the white part should be white. It looks grey.
Now here is the same photo, with the WB adjusted for cloudy daylight conditions; ie, the conditions that under which the photo was taken.
Now that I have adjusted the WB you can see that there is an improvement; the colours look more natural but it is still not right; the white part of the tail still looks a bit grey.
This is because there is a slight blue cast to the whole image which we need to get rid of.
Removing a colour cast
There are various ways that you can remove a colour cast. The most common is to make an adjustment to the colours by using the Hue sliders, reducing the colour that is causing the cast.
Control Points
Some programs though, have a much simpler tool called a control point. I use Nikon Capture NX which has black and white control points.
The way a white control point works is simple; you identify a part of your photograph that you know should be white. Place a control point on this spot and the software adjusts the balance of the photo so that the spot you have marked becomes white. By doing this, and removing any colour cast, all the other colours in the photo become truer as well.
Here is the same photo after I have applied the white control point.
The photo still needs some polishing but you can see that at least the whites now look white.
Calibrate your monitor
Of course before you can do any of this accurately you need to make sure that your monitor is properly calibrated. If you are processing photographs a properly calibrated monitor is essential because even though your photos might look OK to you, they will not look OK to someone who is using a calibrated monitor or even one that is not calibrated but which has different settings applied.
So if your monitor is not calibrated then you’ll need to do that straight away.


